0%

SpringAop浅析

SpringAop浅析

介绍

AOP面向切面编程。在运行时,动态的将代码织入到类的指定方法,指定位置上的思想。实际上AOP不一定都像Spring Aop那样实现,Spring Aop是通过在运行时生成代理对象来进行织入。还有其他的方式,比如AspectJ是在编译期、类加载期织入。本篇文章就来介绍,Spring Aop在运行时生成代理对象的时期和过程。

基础回顾

​ 若想使用SpringAop可以通过两种方式,一种是声明式,通过调用Api的方式;一种是通过注解方式。两者在真正触发生成代理对象的点略有不同。

1.声明式

​ 这里只做简单介绍,首先需要实现某种通知类型的接口,再实现切点接口(Pointcut),如果是环绕通知,需将通知实现类和切点实现类绑定DefaultPointcutAdvisor,最后在客户代码中将通知、目标类等信息添加到ProxyFactory实例中后,通过ProxyFactorygetProxy();获取代理对象,从而实现SpringAop

2.注解式

​ 通过@Aspect标记一个类为切面类,并通过@Pointcut注解标记一个切点,最后通过注解标记通知类型,比如环绕通知使用@Around进行Aop的业务处理。

那么Spring如何去解析这些注解?在什么时机解析?

原理

1.开启SpringAop

​ 在Spring中提供一个开启SpringAop的配置注解@EnableAspectJAutoProxy(在springboot中一般标记在启动类上),在这个注解上使用@Import注解引入SpringAop配置类AspectJAutoProxyRegistrar

1
2
3
4
5
6
7
8
9
10
11
12
13
14
15
16
17
18
19
20
21
22
23
@Target(ElementType.TYPE)
@Retention(RetentionPolicy.RUNTIME)
@Documented
@Import(AspectJAutoProxyRegistrar.class)
public @interface EnableAspectJAutoProxy {

/**
* 为true的话开启cglib代理,默认为jdk代理
* Indicate whether subclass-based (CGLIB) proxies are to be created as opposed
* to standard Java interface-based proxies. The default is {@code false}.
*/
boolean proxyTargetClass() default false;

/**
* 是否将代理对象暴露到线程上下文中
* Indicate that the proxy should be exposed by the AOP framework as a {@code ThreadLocal}
* for retrieval via the {@link org.springframework.aop.framework.AopContext} class.
* Off by default, i.e. no guarantees that {@code AopContext} access will work.
* @since 4.3.1
*/
boolean exposeProxy() default false;

}

AspectJAutoProxyRegistrar实现ImportBeanDefinitionRegistrar#registerBeanDefinitions接口,在Spring启动扫描配置类后会调用该接口。

1
2
3
4
5
6
7
8
9
10
11
12
13
14
15
16
17
18
19
20
21
22
23
24
25
26
27
28
29
class AspectJAutoProxyRegistrar implements ImportBeanDefinitionRegistrar {

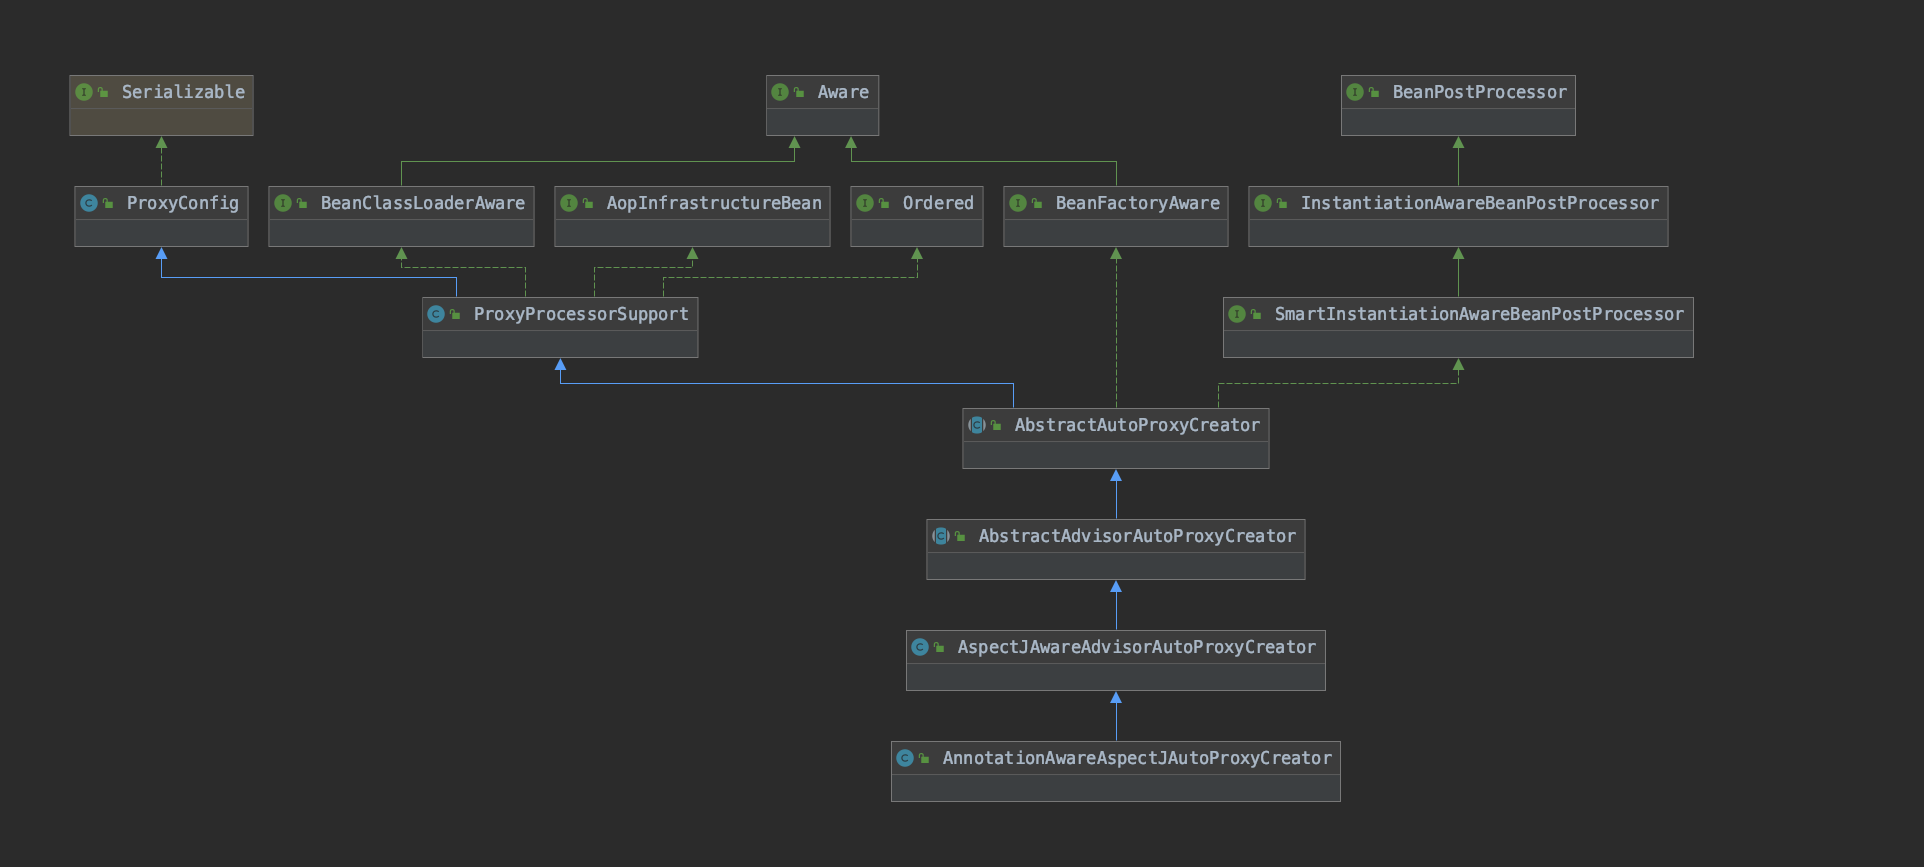
/**
* Register, escalate, and configure the AspectJ auto proxy creator based on the value
* of the @{@link EnableAspectJAutoProxy#proxyTargetClass()} attribute on the importing
* {@code @Configuration} class.
*/
@Override
public void registerBeanDefinitions(AnnotationMetadata importingClassMetadata, BeanDefinitionRegistry registry) {
// 重点在这: 会注册AnnotationAwareAspectJAutoProxyCreator到BeanDefinitionMap中
// AnnotationAwareAspectJAutoProxyCreator是一个BeanPostProcessor后置处理器
// 这个方法比较简单, 可自行跟进去看一眼。
AopConfigUtils.registerAspectJAnnotationAutoProxyCreatorIfNecessary(registry);

AnnotationAttributes enableAspectJAutoProxy =
AnnotationConfigUtils.attributesFor(importingClassMetadata, EnableAspectJAutoProxy.class);
// 解析注解的属性
if (enableAspectJAutoProxy != null) {
// 默认为false
if (enableAspectJAutoProxy.getBoolean("proxyTargetClass")) {
AopConfigUtils.forceAutoProxyCreatorToUseClassProxying(registry);
}
// 默认为false
if (enableAspectJAutoProxy.getBoolean("exposeProxy")) {
AopConfigUtils.forceAutoProxyCreatorToExposeProxy(registry);
}
}
}
}

2.Aop代理对象的生成

​ 在开启SpringAop时添加了一个AnnotationAwareAspectJAutoProxyCreator后置处理器到Spring容器中,在Spring启动的生命周期中,会在适时调用它的实现方法。

​ 看一下这个类的类图,AnnotationAwareAspectJAutoProxyCreator实现了AbstractAutoProxyCreator抽象类,在这个抽象类中,实现了BeanPostProcessor生命周期接口。

1
2
3
4
5
6
7
8
9
10
11
12
13
14
15
16
17
18
19
20
21
22
23
24
25
26
27
28
29
30
31
32
33
34
35
36
37
38
39
40
41
42
43
44
45
46
47
48
49
50
51
52
53
54
55
56
57
58
59
60
61
62
/**
* 在Bean实例化之前调用接口:用于提前生成代理对象
*
* @Author: xiaocainiaoya
* @Date: 2021/06/27 21:55:15
* @param beanClass
* @param beanName
* @return:
**/
@Override
public Object postProcessBeforeInstantiation(Class<?> beanClass, String beanName) {
Object cacheKey = getCacheKey(beanClass, beanName);
// this.advisedBeans用于标记某个key是否需要进行AOP代理
if (!StringUtils.hasLength(beanName) || !this.targetSourcedBeans.contains(beanName)) {
if (this.advisedBeans.containsKey(cacheKey)) {
return null;
}
if (isInfrastructureClass(beanClass) || shouldSkip(beanClass, beanName)) {
this.advisedBeans.put(cacheKey, Boolean.FALSE);
return null;
}
}

// Create proxy here if we have a custom TargetSource.
// Suppresses unnecessary default instantiation of the target bean:
// The TargetSource will handle target instances in a custom fashion.
TargetSource targetSource = getCustomTargetSource(beanClass, beanName);
// 若用户没有自定义,默认情况下是targetSource是空的
if (targetSource != null) {
if (StringUtils.hasLength(beanName)) {
this.targetSourcedBeans.add(beanName);
}
Object[] specificInterceptors = getAdvicesAndAdvisorsForBean(beanClass, beanName, targetSource);
Object proxy = createProxy(beanClass, beanName, specificInterceptors, targetSource);
this.proxyTypes.put(cacheKey, proxy.getClass());
return proxy;
}
return null;
}

/**
* 在Bean初始化之后调用接口:这个接口的调用点是在Bean对象初始化之后, 也就是Bean对象基本
* 上走完了初始化流程。
*
* @Author: xiaocainiaoya
* @Date: 2021/06/27 21:55:15
* @param beanClass
* @param beanName
* @return:
**/
@Override
public Object postProcessAfterInitialization(@Nullable Object bean, String beanName) {
if (bean != null) {
Object cacheKey = getCacheKey(bean.getClass(), beanName);
if (this.earlyProxyReferences.remove(cacheKey) != bean) {
// 一般情况下remove(cacheKey) != bean肯定会成立,因为前者remove方法返回null
// 只有在循环依赖时,可能会出现提前暴露的bean对象与当前bean不等
return wrapIfNecessary(bean, beanName, cacheKey);
}
}
return bean;
}

进入wrapIfNecessary方法

1
2
3
4
5
6
7
8
9
10
11
12
13
14
15
16
17
18
19
20
21
22
23
24
25
26
27
28
29
30
31
32
33
34
protected Object wrapIfNecessary(Object bean, String beanName, Object cacheKey) {
// 如果已经完成代理了,那么直接返回这个代理的对象
if (StringUtils.hasLength(beanName) && this.targetSourcedBeans.contains(beanName)) {
return bean;
}
// 若这个Bean对象被标记无需AOP代理, 直接返回
if (Boolean.FALSE.equals(this.advisedBeans.get(cacheKey))) {
return bean;
}
// 如果不需要代理,直接返回,且标记为无需AOP代理
if (isInfrastructureClass(bean.getClass()) || shouldSkip(bean.getClass(), beanName)) {
this.advisedBeans.put(cacheKey, Boolean.FALSE);
return bean;
}

// Create proxy if we have advice.
// 获取通知可以作用在这个Bean上的通知
// 主要逻辑在AnnotationAwareAspectJAutoProxyCreator#findCandidateAddvisors方法
// 首先获取容器中类型为Advisor的Bean, 再从容器中获取@Aspect注解标记的Bean后, 将二者结合。
// 最后筛选出可以作用到这个Bean的通知。
Object[] specificInterceptors = getAdvicesAndAdvisorsForBean(bean.getClass(), beanName, null);
if (specificInterceptors != DO_NOT_PROXY) {
// 标记这个Bean需要进行AOP代理
this.advisedBeans.put(cacheKey, Boolean.TRUE);
// 创建代理对象, 这里是重点
Object proxy = createProxy(
bean.getClass(), beanName, specificInterceptors, new SingletonTargetSource(bean));
this.proxyTypes.put(cacheKey, proxy.getClass());
return proxy;
}

this.advisedBeans.put(cacheKey, Boolean.FALSE);
return bean;
}

进入createProxy方法

1
2
3
4
5
6
7
8
9
10
11
12
13
14
15
16
17
18
19
20
21
22
23
24
25
26
27
28
29
30
31
32
33
34
35
36
37
38
39
protected Object createProxy(Class<?> beanClass, @Nullable String beanName,
@Nullable Object[] specificInterceptors, TargetSource targetSource) {

if (this.beanFactory instanceof ConfigurableListableBeanFactory) {
AutoProxyUtils.exposeTargetClass((ConfigurableListableBeanFactory) this.beanFactory, beanName, beanClass);
}
// 创建代理工厂类
ProxyFactory proxyFactory = new ProxyFactory();
proxyFactory.copyFrom(this);

if (!proxyFactory.isProxyTargetClass()) {
if (shouldProxyTargetClass(beanClass, beanName)) {
proxyFactory.setProxyTargetClass(true);
}else {
evaluateProxyInterfaces(beanClass, proxyFactory);
}
}
// 将Interceptors转化为具体的Advisor子类的类型
Advisor[] advisors = buildAdvisors(beanName, specificInterceptors);
proxyFactory.addAdvisors(advisors);
proxyFactory.setTargetSource(targetSource);
customizeProxyFactory(proxyFactory);

proxyFactory.setFrozen(this.freezeProxy);
if (advisorsPreFiltered()) {
proxyFactory.setPreFiltered(true);
}
return proxyFactory.getProxy(getProxyClassLoader());
}

/**
* createAopProxy():根据一定的配置规则获取动态代理工厂的实现类(jdk动态代理或者是cglib动态代理)
*
* @Author: xiaocainiaoya
* @Date: 2021/06/27 21:55:15
**/
public Object getProxy(@Nullable ClassLoader classLoader) {
return createAopProxy().getProxy(classLoader);
}

我这边跟踪下来createAopProxy()返回的是cglib动态代理的实现,所以以cglib动态代理为例,继续往下走。进入CglibAopProxy#getProxy

1
2
3
4
5
6
7
8
9
10
11
12
13
14
15
16
17
18
19
20
21
22
23
24
25
26
27
28
29
30
31
32
33
34
35
36
37
38
39
40
41
42
43
44
45
46
47
48
49
50
51
52
53
54
55
56
57
58
@Override
public Object getProxy(@Nullable ClassLoader classLoader) {
if (logger.isTraceEnabled()) {
logger.trace("Creating CGLIB proxy: " + this.advised.getTargetSource());
}

try {
// 获取正在包装的bean的类型
Class<?> rootClass = this.advised.getTargetClass();
Assert.state(rootClass != null, "Target class must be available for creating a CGLIB proxy");

Class<?> proxySuperClass = rootClass;
if (rootClass.getName().contains(ClassUtils.CGLIB_CLASS_SEPARATOR)) {
proxySuperClass = rootClass.getSuperclass();
Class<?>[] additionalInterfaces = rootClass.getInterfaces();
for (Class<?> additionalInterface : additionalInterfaces) {
this.advised.addInterface(additionalInterface);
}
}

// Validate the class, writing log messages as necessary.
validateClassIfNecessary(proxySuperClass, classLoader);

// Configure CGLIB Enhancer...
Enhancer enhancer = createEnhancer();
if (classLoader != null) {
enhancer.setClassLoader(classLoader);
if (classLoader instanceof SmartClassLoader &&
((SmartClassLoader) classLoader).isClassReloadable(proxySuperClass)) {
enhancer.setUseCache(false);
}
}
enhancer.setSuperclass(proxySuperClass);
// 设置需要代理的接口
enhancer.setInterfaces(AopProxyUtils.completeProxiedInterfaces(this.advised));
enhancer.setNamingPolicy(SpringNamingPolicy.INSTANCE);
enhancer.setStrategy(new ClassLoaderAwareGeneratorStrategy(classLoader));

Callback[] callbacks = getCallbacks(rootClass);
Class<?>[] types = new Class<?>[callbacks.length];
for (int x = 0; x < types.length; x++) {
types[x] = callbacks[x].getClass();
}
// fixedInterceptorMap only populated at this point, after getCallbacks call above
enhancer.setCallbackFilter(new ProxyCallbackFilter(
this.advised.getConfigurationOnlyCopy(), this.fixedInterceptorMap, this.fixedInterceptorOffset));
enhancer.setCallbackTypes(types);

// Generate the proxy class and create a proxy instance.
// 创建具体的代理对象实例
return createProxyClassAndInstance(enhancer, callbacks);
}catch (CodeGenerationException | IllegalArgumentException ex) {
throw new AopConfigException("Could not generate CGLIB subclass of " + this.advised.getTargetClass() + ": Common causes of this problem include using a final class or a non-visible class",ex);
}catch (Throwable ex) {
// TargetSource.getTarget() failed
throw new AopConfigException("Unexpected AOP exception", ex);
}
}

3.代理对象的调用

DynamicAdvisedInterceptor#intercept

1
2
3
4
5
6
7
8
9
10
11
12
13
14
15
16
17
18
19
20
21
22
23
24
25
26
27
28
29
30
31
32
33
34
35
36
37
38
39
40
41
42
43
44
45
46
47
48
@Override
@Nullable
public Object intercept(Object proxy, Method method, Object[] args, MethodProxy methodProxy) throws Throwable {
Object oldProxy = null;
boolean setProxyContext = false;
Object target = null;
TargetSource targetSource = this.advised.getTargetSource();
try {
if (this.advised.exposeProxy) {
// Make invocation available if necessary.
oldProxy = AopContext.setCurrentProxy(proxy);
setProxyContext = true;
}
// Get as late as possible to minimize the time we "own" the target, in case it comes from a pool...
target = targetSource.getTarget();
Class<?> targetClass = (target != null ? target.getClass() : null);
// 获取匹配该方法的通知列表
// 主要逻辑在DefaultAdvisorChainFactory#getInterceptorsAndDynamicInterceptionAdvice方法中
// 根据advised中的通知列表,对当前调用方法进行匹配,将匹配成功的通知转为拦截器链返回。
List<Object> chain = this.advised.getInterceptorsAndDynamicInterceptionAdvice(method, targetClass);
Object retVal;
// Check whether we only have one InvokerInterceptor: that is,
// no real advice, but just reflective invocation of the target.
if (chain.isEmpty() && Modifier.isPublic(method.getModifiers())) {
// We can skip creating a MethodInvocation: just invoke the target directly.
// Note that the final invoker must be an InvokerInterceptor, so we know
// it does nothing but a reflective operation on the target, and no hot
// swapping or fancy proxying.
Object[] argsToUse = AopProxyUtils.adaptArgumentsIfNecessary(method, args);
retVal = methodProxy.invoke(target, argsToUse);
}
else {
// We need to create a method invocation...
// 实例化CglibMethodInvocation后执行proceed方法
retVal = new CglibMethodInvocation(proxy, target, method, args, targetClass, chain, methodProxy).proceed();
}
retVal = processReturnType(proxy, target, method, retVal);
return retVal;
}finally {
if (target != null && !targetSource.isStatic()) {
targetSource.releaseTarget(target);
}
if (setProxyContext) {
// Restore old proxy.
AopContext.setCurrentProxy(oldProxy);
}
}
}

执行拦截器链proceed(),进入ReflectiveMethodInvocation#proceed方法

1
2
3
4
5
6
7
8
9
10
11
12
13
14
15
16
17
18
19
20
21
22
23
24
25
26
27
28
29
30
31
32
@Override
@Nullable
public Object proceed() throws Throwable {
// We start with an index of -1 and increment early.
// 表明执行到链尾, 直接通过反射调用目标方法
if (this.currentInterceptorIndex == this.interceptorsAndDynamicMethodMatchers.size() - 1) {
return invokeJoinpoint();
}

// 获取到下一个要执行的拦截器
Object interceptorOrInterceptionAdvice = this.interceptorsAndDynamicMethodMatchers.get(++this.currentInterceptorIndex);
if (interceptorOrInterceptionAdvice instanceof InterceptorAndDynamicMethodMatcher) {
// Evaluate dynamic method matcher here: static part will already have
// been evaluated and found to match.
InterceptorAndDynamicMethodMatcher dm = (InterceptorAndDynamicMethodMatcher) interceptorOrInterceptionAdvice;
Class<?> targetClass = (this.targetClass != null ? this.targetClass : this.method.getDeclaringClass());
if (dm.methodMatcher.matches(this.method, targetClass, this.arguments)) {
return dm.interceptor.invoke(this);
} else {
// Dynamic matching failed.
// Skip this interceptor and invoke the next in the chain.
return proceed();
}
} else {
// It's an interceptor, so we just invoke it: The pointcut will have
// been evaluated statically before this object was constructed.
// 调用拦截器中的invoke方法,可以看到这里将this作为参数传入了,这里是一种拦截器链的典型用法
// 在我之前有篇[从myBatis Plugin看责任链模式]中有两种拦截器链的典型用法,二者的区别就是
// 有没有携带链对象,这里明显是携带链对象,从而达到拦截器链逐个执行的目的。
return ((MethodInterceptor) interceptorOrInterceptionAdvice).invoke(this);
}
}

这里返回的是根据通知类型的不同会进入到不同的具体实现中,比如我的测试代码是环绕通知类型,这里进入环绕通知的具体实现中AspectJAroundAdvice#invoke去执行当前链节点的invoke方法。

1
2
3
4
5
6
7
8
9
10
11
12
13
14
15
16
17
18
19
20
21
22
23
24
25
26
27
28
29
30
31
32
33
34
35
36
37
38
39
40
@Override
public Object invoke(MethodInvocation mi) throws Throwable {
if (!(mi instanceof ProxyMethodInvocation)) {
throw new IllegalStateException("MethodInvocation is not a Spring ProxyMethodInvocation: " + mi);
}
ProxyMethodInvocation pmi = (ProxyMethodInvocation) mi;
// 这里只是将链对象包装了一层
ProceedingJoinPoint pjp = lazyGetProceedingJoinPoint(pmi);
JoinPointMatch jpm = getJoinPointMatch(pmi);
return invokeAdviceMethod(pjp, jpm, null, null);
}

protected Object invokeAdviceMethod(JoinPoint jp, @Nullable JoinPointMatch jpMatch,
@Nullable Object returnValue, @Nullable Throwable t) throws Throwable {
return invokeAdviceMethodWithGivenArgs(argBinding(jp, jpMatch, returnValue, t));
}

protected Object invokeAdviceMethodWithGivenArgs(Object[] args) throws Throwable {
Object[] actualArgs = args;
if (this.aspectJAdviceMethod.getParameterCount() == 0) {
actualArgs = null;
}
try {
// 反射调用通知方法
ReflectionUtils.makeAccessible(this.aspectJAdviceMethod);
// TODO AopUtils.invokeJoinpointUsingReflection
// 把链对象封装在了这个arctualArgs(MethodInvocationProceedingJoinPoint)中了,
// 所以切面方法中通过jointPoint.process()方法实际调用方法是与链对象挂钩的, 如果执行
// 到链尾这调用目标对象, 若非链尾, 则继续进入链节点对象。
return this.aspectJAdviceMethod.invoke(this.aspectInstanceFactory.getAspectInstance(), actualArgs);
}
catch (IllegalArgumentException ex) {
throw new AopInvocationException("Mismatch on arguments to advice method [" +
this.aspectJAdviceMethod + "]; pointcut expression [" +
this.pointcut.getPointcutExpression() + "]", ex);
}
catch (InvocationTargetException ex) {
throw ex.getTargetException();
}
}

以我的测试代码为例,环绕通知@Around("testPointcut()")的标记实现方法中,一般在前置执行一些业务代码之后,会调用ProceedingJoinPoint#process()方法,后再调用后置的业务代码。

ProceedingJoinPoint#process()方法就是转入下一个拦截器链的方法。

1
2
3
4
5
6
7
// MethodInvocationProceedingJoinPoint
@Override
public Object proceed() throws Throwable {
// 这个proceed()方法就回到了上面的ReflectiveMethodInvocation#proceed,且
// 链下标不是-1, 而是下一个链节点的下标。
return this.methodInvocation.invocableClone().proceed();
}

注意:我这里使用的是springboot项目,仅在项目启动类上添加了一个@EnableAspectJAutoProxy,且默认情况下该注解的proxyTargetClass()属性为false,那么为什么我在调试的时候会进入到Cglib动态代理的实现中,逻辑上应该是使用jdk动态代理?

​ 这是因为springboot的自动装配AopAutoConfiguration中,配置的是cglib动态代理。

1
2
3
4
5
6
7
8
9
10
11
12
13
14
15
16
17
18
19
20
21
22
23
24
25
26
27
28
29
30
31
32
33
34
35
36
37
38
39
40
41
42
43
@Configuration(proxyBeanMethods = false)
@ConditionalOnProperty(prefix = "spring.aop", name = "auto", havingValue = "true", matchIfMissing = true)
public class AopAutoConfiguration {

@Configuration(proxyBeanMethods = false)
@ConditionalOnClass(Advice.class)
static class AspectJAutoProxyingConfiguration {

/**
* 采用jdk动态代理的配置:需明确指定配置项spring.aop.proxy-target-class=false
*/
@Configuration(proxyBeanMethods = false)
@EnableAspectJAutoProxy(proxyTargetClass = false)
@ConditionalOnProperty(prefix = "spring.aop", name = "proxy-target-class", havingValue = "false",matchIfMissing = false)
static class JdkDynamicAutoProxyConfiguration {

}

/**
* 采用cglib动态代理的配置:明确指定配置项spring.aop.proxy-target-class=true或者无该配置项时
* 启用cglib动态代理
*/
@Configuration(proxyBeanMethods = false)
@EnableAspectJAutoProxy(proxyTargetClass = true)
@ConditionalOnProperty(prefix = "spring.aop", name = "proxy-target-class", havingValue = "true",matchIfMissing = true)
static class CglibAutoProxyConfiguration {

}
}

@Configuration(proxyBeanMethods = false)
@ConditionalOnMissingClass("org.aspectj.weaver.Advice")
@ConditionalOnProperty(prefix = "spring.aop", name = "proxy-target-class", havingValue = "true",matchIfMissing = true)
static class ClassProxyingConfiguration {
ClassProxyingConfiguration(BeanFactory beanFactory) {
if (beanFactory instanceof BeanDefinitionRegistry) {
BeanDefinitionRegistry registry = (BeanDefinitionRegistry) beanFactory;
AopConfigUtils.registerAutoProxyCreatorIfNecessary(registry);
AopConfigUtils.forceAutoProxyCreatorToUseClassProxying(registry);
}
}
}
}

总结

​ 这里只是对SpringAop做了个很浅的分析,主要是明确SpringAop的大致创建时机、创建流程和基本的调用流程。SpringAop是采用动态代理的方式实现,通过@EnableAspectJAutoProxy的方式开启,开启的原理为添加AnnotationAwareAspectJAutoProxyCreator后置处理器到BeanDefinitionMap中;在Bean对象实例化之前可以通过用户自定义的方式进行提前生成代理对象。或者是在Bean对象初始化之后,通过上述后置处理器的postProcessAfterInitialization方法,将Bean对象转为代理对象。

​ 在业务中调用代理对象的某个方法时,进入对应的拦截方法intercept方法,该方法会去获取匹配当前被调用方法的拦截器链,进入链对象后,通过反射调用对应的切面方法后,通过链对象调用下一个链节点,从而遍历整个拦截器链列表,这是一种典型的拦截器设计,我之前也有写一篇文章这里,简单的介绍了拦截器的两种使用方式。

-------------本文结束感谢您的阅读-------------